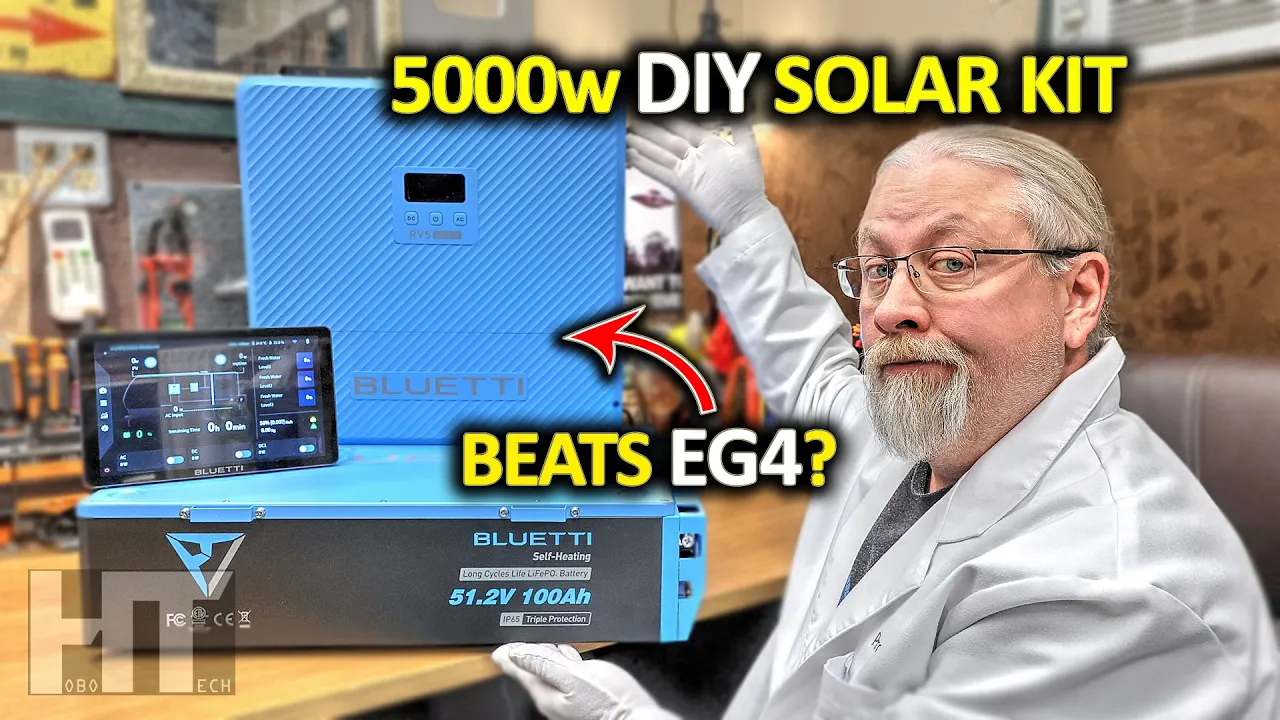
ecoflow delta pro ultra smart home panel 2

Power Your Home! Ecoflow Smart Home Panel 2: Complete Backup System Install & Review

The Professor installs two 7200w Delta Pro Ultra power stations with the Smart Home Panel 2 complete LiFePO4 battery home backup system.

In January, I did a full review of Ecoflow’s new 7200 watt behemoth, the Delta Pro Ultra and they also sent along with it their new Smart Home Panel version 2. My Delta Pro Ultra at the time was a prototype model with some limitations and they have since swapped it out for a pair of shiny new retail models so that I could demonstrate what this Smart Home Panel 2 can do, and find out … is it any good?

Now the SHP2 (which I will call “the home panel” from this point on), does require some installation. The amount of installation depends on what you’re using it for. If you’re installing it as a replacement to your existing breaker panel or alongside an existing one, how many circuits you plan to use it with, if you need both 120v and 240v service (which would be a big yes if you’re using for your home or in a garage to charge an electric vehicle), and the biggest pain point is going to be if you plan on having your Delta Pro Ultra (or DPU) in the same location as the home panel or in a different location.

My installation difficulty I will consider moderate since I will be requiring 240v service and instead of replacing my existing breaker panel that’s full of spaghetti and stuck between wall studs too narrow to fit the home panel, I’ll be installing it along side my current breaker box as a supplement to run just a few circuits. Over time, I will likely add additional circuits to it but for this demonstration my plan is to install a single 240v 50A line that goes to my full hookup RV site, and a pair of 120v 20A lines that run the freshly installed outlets my new lab addition. The rest of the building circuits that existed when I got here will remain in the old box. I’m also going to install the Delta Pro Ultras in a separate room so that is going to entail running some heavy duty 50A cabling about 25 feet from their location in the next room over to where the Smart Home Panel 2 will reside next to my current breaker box.

DISCLAIMER: Now everything I’m going to talk about from this point forward is going to apply to the United States and other parts of North America that run dual phase 240v grid power at 60hz into residential properties. This install is also going to follow the local electrical codes so what I do may not apply entirely to you if you live somewhere else. This review is not meant to substitute for professional advice from a certified electrician and is for entertainment purposes only. Anything you repeat in this video is at your own risk.

Now that’s out of the way … Here is all the equipment I’ll be installing over the next few days.

  • We have a pair of Ecoflow DPU’s with a total inverter output of 14,4kW and that will be at 240v. Since we have a pair of 6kWh batteries we’ll have a total of 12kWh available. I will expand this capacity later.

  • We have of course the Smart Home Panel 2 which comes shipped like this in one big piece. This bottom part is where up to 3 DPU’s can plug in, and can be separated and installed in a separate location. This is what we’re going to do. Note that if you do install the input box in a separate location, you’re going to need to run 6 gauge cabling if you have 2 DPU’s, and 2 gauge cabling if you have 3 DPU’s. I’ll be using 6/3 Romex for this install good for 55A since I only have a pair of DPU’s.

    • Also of note, that you’ll need to run an equal length of Category 6 or better Ethernet cable to digitally connect the DPU input box to the Home Panel. The Home Panel contains the brains of the unit along with the Bluetooth and Wi-Fi antenna. So where you install the Home Panel will need Internet access to sync with the Ecoflow app and also do any updates. Now, if you don’t plan to ever use the wireless features you can install this in an area without Wi-Fi but you really should “bench install” it first in a location with Internet so that you can get everything online, setup the way you want it which can only be done via the app, and do any firmware updates before you do the permanent install offline.

  • Last but not least we have the Ecoflow Power Insight display which is basically just a big Android app that let’s you see real time what’s going on between the Home Panel and DPU units. This way you don’t have to keep looking at your app. You can mount this anywhere as it works wirelessly. It does charge with USB-C and has a cool magnetic mount so you can wall mount it then quickly remove it to carry it around.

INSTALL

Okay, so let’s show you the before shot and explain what we’re going to do. Then I’ll try getting some footage during the actual install. When it’s all done we‘ll fire it all up and run the home panel through its paces. The home panel does track usage over time so I’m hoping to get at least a few days of data before this video has to come out.

  • Now that the install is complete, let’s check it out. [tour]

  • The Home Panel 2 is a Smart space saving design that can be installed in two different ways. Because I decided not to have the DPU’s in the same room as the Smart Home Panel 2, installation was significantly more difficult than it would have been to have everything in one place. It took one and a half people about 8 hours (or 12 man hours) start to finish, and then another couple of hours for me to program it and get everything online. You don’t just flip a switch and the home panel starts working. You have to tell it via the app every circuit you want turned on and if that circuit is 120v or 240v.

  • It’s all very easy to do though, and the app is fantastic. Since this sucker’s electrical, it’s far safer than gas, propane, or diesel generators. There are no exhaust pipes to run, fuel to store or leak, and no chance of CO poisoning. Unlike a gas generator, this can be installed entirely indoors and it’s so quiet you can even sleep in the same room. Doing that with a fuel generator of any kind would not just be annoying, but deadly.

  • The install, however, didn’t go perfectly. I did end up wasting a solid half an hour because nowhere in the instructions does it say the face plate needs to be installed before the thing will work. I was pulling my hair out (and I have a lot of hair) trying to figure out why the DPU’s wouldn’t send power to the panel. Even with the grid power turned on, nothing works without that front panel in place. The outer swing door is optional. Speaking of the door, it can open in either direction.

  • Other flubs during install. Don’t forget about the Cat 6 (or better) Ethernet network cable like my installer did. We ended up running it outside of the conduit into the home panel because the main cable was already blocking up the conduit. Fortunately, my install is indoors so we don’t have to be concerned with weather proofing anything or rodents chewing cables.

  • We used simple 2 inch PVC pipes, unglued, because I may want to run additional cabling for an upcoming project. 2 inch pipes made it easy to navigate those 90 degree bends with that 6 gauge 3 conductor non-metallic cable (in electrical speak that’s 6/3 NMB cabling). The cable I got ran about $4/foot so don’t forget to factor that cost into your installation.

  • Installation costs for me here in rural Arizona ran about $700 for parts and labor to run the DPU box about 25 feet from the home panel, and to rewire several circuits from inside the wall over to the home panel. This same job in California would be about double. It would also be a lot more expensive if this was an outdoor installation. Then again, if you plan to keep the DPU and home panel in the same location then parts & labor costs would be minimal. Ecoflow states that it takes about 4 hours to install and that sounds about right if you’re putting everything in one place, and you have an electrician that goes gangbusters on it.

  • Speaking of regulations, some electricians won’t touch anything not UL listed. The Smart Home Panel 2 is UL1741 certified so getting it installed professionally won’t be a problem. In the states of California and Texas, Ecoflow is also offering free consulting to find you a local installer.

DEMO

  • Okay now let’s talk about what this thing can do and I’ll then demonstrate all of the major features. It is a very impressive piece of technology.

    • Because the units balance themselves, you can technically send all of your solar into one DPU and once they are out of balance, the power will be sent to the lower voltage battery. Although, if you do have multiple DPU’s in this setup I do recommend trying to put some solar (or external battery charging) on each if possible just so you don’t get stuck in a situation where you need maximum inverter power while the batteries are balancing.
    • Speaking of solar, the DPU’s dual input is class leading by a mile. You have both a high and low voltage input good for a total of 5600 watts. The low input can take 30-150v while the high input can take 80-450v simultaneously. This is more than double the solar capacity of the competing flagships. For a comprehensive review of the Delta Pro Ultra be sure to check out my full technical review from January. I’ll link that up here and in the description of this video.

  • Power Insight

    • Unlike the app, the Power Insight “all in one” energy management system works without Internet access. You get all the information about your system in one place that can be hung on a wall to wirelessly charge then moved around your property to wherever you need it. You can even run other connected home appliances with it like smart plugs, thermostats, and matter supported smart devices. It also shows the temperature and humidity of the area it is in.

    • What about ROI or return on investment? Now I do have a couple of days of data in the system for a small 400 sqft well insulated outbuilding. You can see here that I already saved a few bucks off my next electric bill. While there is a large upfront cost, that’s money no longer stuffing someone else’s pocket. They can raise rates as much as they like or have rolling blackouts every day and I won’t care now. Bring on those monsoon thunderstorms!

    • Speaking of storms, we actually had a 2 hour long blackout the other night due to a nasty snow storm and the Smart Home Panel 2 rocked it like a champ. You can actually see the blackout occur when reviewing the data history for that day. I also got a message from the Ecoflow app that the grid was down and the home panel was powering loads. That’s so cool!

    • Obviously, the more loads you power via solar and the higher your electric rates are, the faster you’ll roll back that electric meter. If you have a time of use plan with your electric company, you can really save a load of cash because the home panel system lets you charge from the grid when rates are lowest, then will power your home from batteries when rates are high. Add some solar charging into that equation, and yes with this system set up properly, it can literally pay for itself over time. Especially when you factor in the current solar tax credits and ability to deduct about a third of the cost. If you have a medical necessity like a CPAP machine or Oxygen Concentrator, you may qualify for additional tax deductions. Check with your tax professional for more details.

    • One thing that is cool about solar incentives is that you can install your basic system this year, and say next year you realize you need more DPU batteries or inverters, you can take those same deductions again the following year too for your new equipment.

OUTRO

  • So the big question here is, do I think buying the Smart Home Panel 2 is a wise investment if you’re planning to plug one or more Delta Pro Ultras (or Delta Pros – and yes, that model is supported as well) into the wiring for your home, cabin, business, or off grid property? That depends…

    • First, the Smart Home Panel 2 does require dual phase 240v grid power to fully function. What I mean by that, is you can technically run the panel from a 120v source through the Generator input. At the top of the panel there is a manual safety switch built in that lets you switch from grid to generator for charging the batteries. I’m told that in 120v mode that only half of the circuits will work, but it will charge all of the attached battery units from 120v. So it is technically possible to use this panel totally off the grid if you have another 120v or 240v power source like a gas generator or even another inverter system. Since the panel is designed with grid tie in mind, it is expecting this source to run 24 hours a day. I’m going to spill the beans here and give you a hint that I will cover this scenario next month, when I run the Ecoflow Power Kits into this thing as a 120v generator. We’ll find out then just how well it works.

    • So if you have typical 240v grid service, I’d say this thing is magic and definitely worth the cost especially if you plan on running more than one Delta Pro Ultra into it – as it’s simply the best, safest, and fastest way to dump grid power into these units and get it back when you need it or at your beck and call. It’s just super awesome to push a button my app and decide how to power my building. I am going to soon hook it to my entire home and I’ll have an update coming on how that goes.

    • If you live totally off grid without 240v service, only plan to use a single DPU to power limited loads, or already have a transfer switch system in place then you’ll need to figure out of the upgrade cost is worth it to you. I think in a lot of cases it will, and in some cases it won’t. For example, if you just feed one DPU into a transfer switch and only charge it with solar, then the home panel won’t make a lot of sense.

    • What I’ve been using here in my lab for the past year or so is a manual transfer switch system that lets me swap between grid power and inverter power. That inverter power used to be a Renogy Lycan but is now an Ecoflow Power Kit. I had to disable that setup for this install so now I’m stuck using Ecoflow products to power my lab. That’s okay though because they are always very responsive when it comes to issues. I can always spend 15-20 minutes twisting a screwdriver to put the old transfer switch back in place if I have to. This only means we’re certainly going to be doing some long term updates on this product in 2024 and maybe beyond.

  • If you’re interested in the Smart Home Panel 2 or the bundle deal with one or more Delta Pro Ultra solar generators, I do have a discount code available that will knock a HUGE chunk of change off until April 26th, 2024. After that, you’re on your own.

  • If you’re concerned that you can’t pay for the entire system in one go, Ecoflow does offer financing with the first 6 months interest free (which is a big deal with today’s interest rates). Don’t forget to claim those tax incentives as well that will make this system a lot more affordable in the long run.

  • CHECK IT OUT: https://gohobo.io/shp2 use code EFDPUHOBO8 for $800 off until Apr 26th!

  • Now enjoy 6-month interest-free payments plan offer, available for as little as $834 per month. For TX & CA homeowners: check out the latest ‘Hassle-Free bundle’- including a DELTA Pro Ultra, a Smart Home Panel 2, plus installation service, all for just $8,999. for all US homeowners: The Smart Home Panel 2 Installation Consulting Service ensures a worry-free setup by tracking orders, managing fittings, and answering technical queries.

.


bougerv yuma cigs review

BougeRV Yuma CIGS “Bulletproof” 200w Solar Panel Install | 6 Month Follow Up

The Professor performs a 6 MONTH follow up review covering installation and performance of the shade tolerant, virtually indestructible BougeRV Yuma CIGS with a 12 year warranty!

bougerv yuma cigs review
click here to watch the video

The BougeRV Yuma CIGS panel was such a popular product that it ended up selling out a few weeks after I published my review, and was out of stock through the entire 2023 holiday season up until just recently. BougeRV told me the Yuma CIGS is now back with plenty in stock so it’s appropriate that I finally finish the follow up video I had planned to release several months ago.

In this follow up, I’m going to share with you how I installed the panels on my RV. How they’ve held up in the 6 months I’ve been using them. How much power they output under the worst conditions possible and how they work after being shot full of holes then fully submerged underwater (no joke),

Let’s start with installation. Now the Yuma CIGS comes in two install versions. One has strips of very strong adhesive on the back that’s akin to Eternabond, which is a popular, very sticky, RV roofing product. The other simply has grommets around the edge allowing you to install on a porous surface or other surface where the adhesive won’t work such as on a shingled roof.

I actually have both kinds installed on my RV because in order to fit one of the 200w panels over the badly placed factory solar roof gland (which I really can’t relocate) I needed to use the grommet version so it could bend over top of the gland box and not lose cohesion. The other two panels I have installed are the adhesive type. 

As for roof prep, I had the “Chuck Yeager of electric bikes” Kevin from Canada help by thoroughly pressure washing the roof with soap and water first. Now this RV has a textured EDPM rubber roof so it is perfect for using adhesive on but it needs to be perfectly clean.

After the roof was washed and dried, the roof was then cleaned entirely with isopropyl or rubbing alcohol. It took about 5 quarts to do the entire roof. After that completely dried overnight, the solar panels were applied one at a time starting with the front adhesive panels and working our way back. The grommet panel was installed last with typical roofing screws with rubber washers and lap sealant was applied over and under the holes.

In hindsight, I’m second guessing this panel install because at Quartzsite during some high cross winds one of the corners that wasn’t screwed down good enough came loose and started flapping on the roof. I had to use duct tape to secure it which amazingly enough has still held after driving highway speeds for hours and being in rain and snow since. I may decide to remove this 200w panel and replace it with a pair of 100w CIGS so I can get around that gland box without having a big hump in the panel.

I had a few viewers ask if an air gap is needed or if they should be installed on something like Duraplast sheets before mounting. The answer is that CIGS panels are very heat tolerant and won’t be damaged when applied properly. The adhesive panels do have air gaps between the strips that help with cooling. You could certainly install them on corrugated plastic if you desire. The cooler they run the more power they produce just like any other solar panel. However, they don’t suffer from delamination that flex panels due when subjected to high heat. In fact, they can handle temperatures up to 185 degrees F before taking damage. That’s hot enough to cook an egg in 6 minutes. So don’t drive through any life size toaster ovens.

The last question I had about install was how do you remove them if you use the adhesive. The answer I got from BougeRV was to use a strong wire or a plastic spatula to separate the panel from the roof then soak the adhesive in Ethyl alcohol to dissolve it.

So before I left on my 5 week camping trip to Quartzsite, the panels on the RV were repeatedly soaked with rain, withstood winds over 50 mph, and had over a foot of snow sitting on them for a week which then turned into ice. When I left home, the roof was covered with about 2 inches of ice with about 4 inches of snow on top of that. This melted and came off as I drove down the mountain 6000 feet to Quartzsite.

When I arrived at Quartzsite, it was the dead of winter in early January. It was overcast, not all that warm, and I realized after I had already setup camp that I was facing the wrong way. See, there are two panels on the passenger side and one panel on the driver side. I was parked with the south facing the drivers side. I realized with how low the sun was in the sky that both of the passenger side panels were going to be shaded by the air conditioner. I needed every watt I could get, so I picked up camp, turned the RV 180 degrees so the two passenger side panels faced south, and plopped back down. This made a big difference in output. So take note when you install these flat on your RV roof that you may need to park your RV a certain direction if you camp in the winter time when the sun is low on the horizon. This won’t really be an issue late spring to early fall.

I have some output numbers to show you. Unfortunately, I didn’t realize Victron solar controllers only save 30 days of data by default so I was only able to capture the last week I was camping in February.

You can see here on Feb 10th I peaked at 463w out of 600w and that’s with the panels laying flat and one being shaded by the RV air conditioner. While 463w out of 600w doesn’t sound great, it’s phenomenal for 600w that’s laying flat in the dead of winter with one 200w being at least a third shaded. I recall this day because the day before there was a big storm and my batteries ran down pretty low. You can see the starting volts was only 12.04 with the final volts 13.68 so I didn’t get a full recharge this day. I did get virtually 2kWh total from those 600w of Yuma panels. You can see the other days didn’t do as well but these are real world conditions with real weather.

So, you may be wondering what did I do with that Yuma CIGS I shot full of bullet holes, drug across a gravel driveway, then ran over with an ATV? Well, a friend of mine said he very much wanted it for his truck camper. You might be wondering why someone would install a beat up holy panel on a camper?

While the Yuma CIGS when undamaged is IP68 rated, which means it can be fully submerged in water for up to 30 minutes, wouldn’t the holes allow water to intrude and short the panel out? This was a question some of you asked and I had to experiment to answer. I originally filmed this as a YouTube short but I never posted it because the solar panel sold out. So here is footage that you’ve never seen before taken from last fall.

Once my friend heard about this, he wanted it. I ended up giving him the BougeRV power station to go with it and he did some of his own testing at home with some very surprising results.

So there you have it. Two sets of real world results. It doesn’t seem to make much of a difference if you blow holes in it and dunk it in water. The output barely changes. This is probably why BougeRV offers an incredible 12 year warranty on the Yuma CIGS when purchased on their site through my link and using my discount code. Note that my code will give you a larger discount than the default one on the website so be sure to use it. When you do use my link, it will take you directly to the BougeRV store page and those discount codes will be available below.

I believe BougeRV is still offering HOBOTECH customers a free gift bag containing a cap, koozie, and bag with the HOBOTECH logo and an illustration of me and Odin flying away in a BougeRV fridge. After you order be sure you claim your free gift by visiting this page and entering in your order number. 

CLICK HERE for BOUGERV YUMA CIGS use code HOBOTECH28 for 200w or HOBOTECH18 for 100w.