dell optiplex $125 pc

Reviewing Amazon’s CHEAPEST Gaming PC Computer! Dell OptiPlex


The Professor reviews Amazon’s cheapest Windows 10 Pro, Intel i5 quad core, 4K FULL PC desktop computer with HD LCD monitor, Wi-Fi, Bluetooth, Keyboard / Mouse that’s gaming and workstation ready!

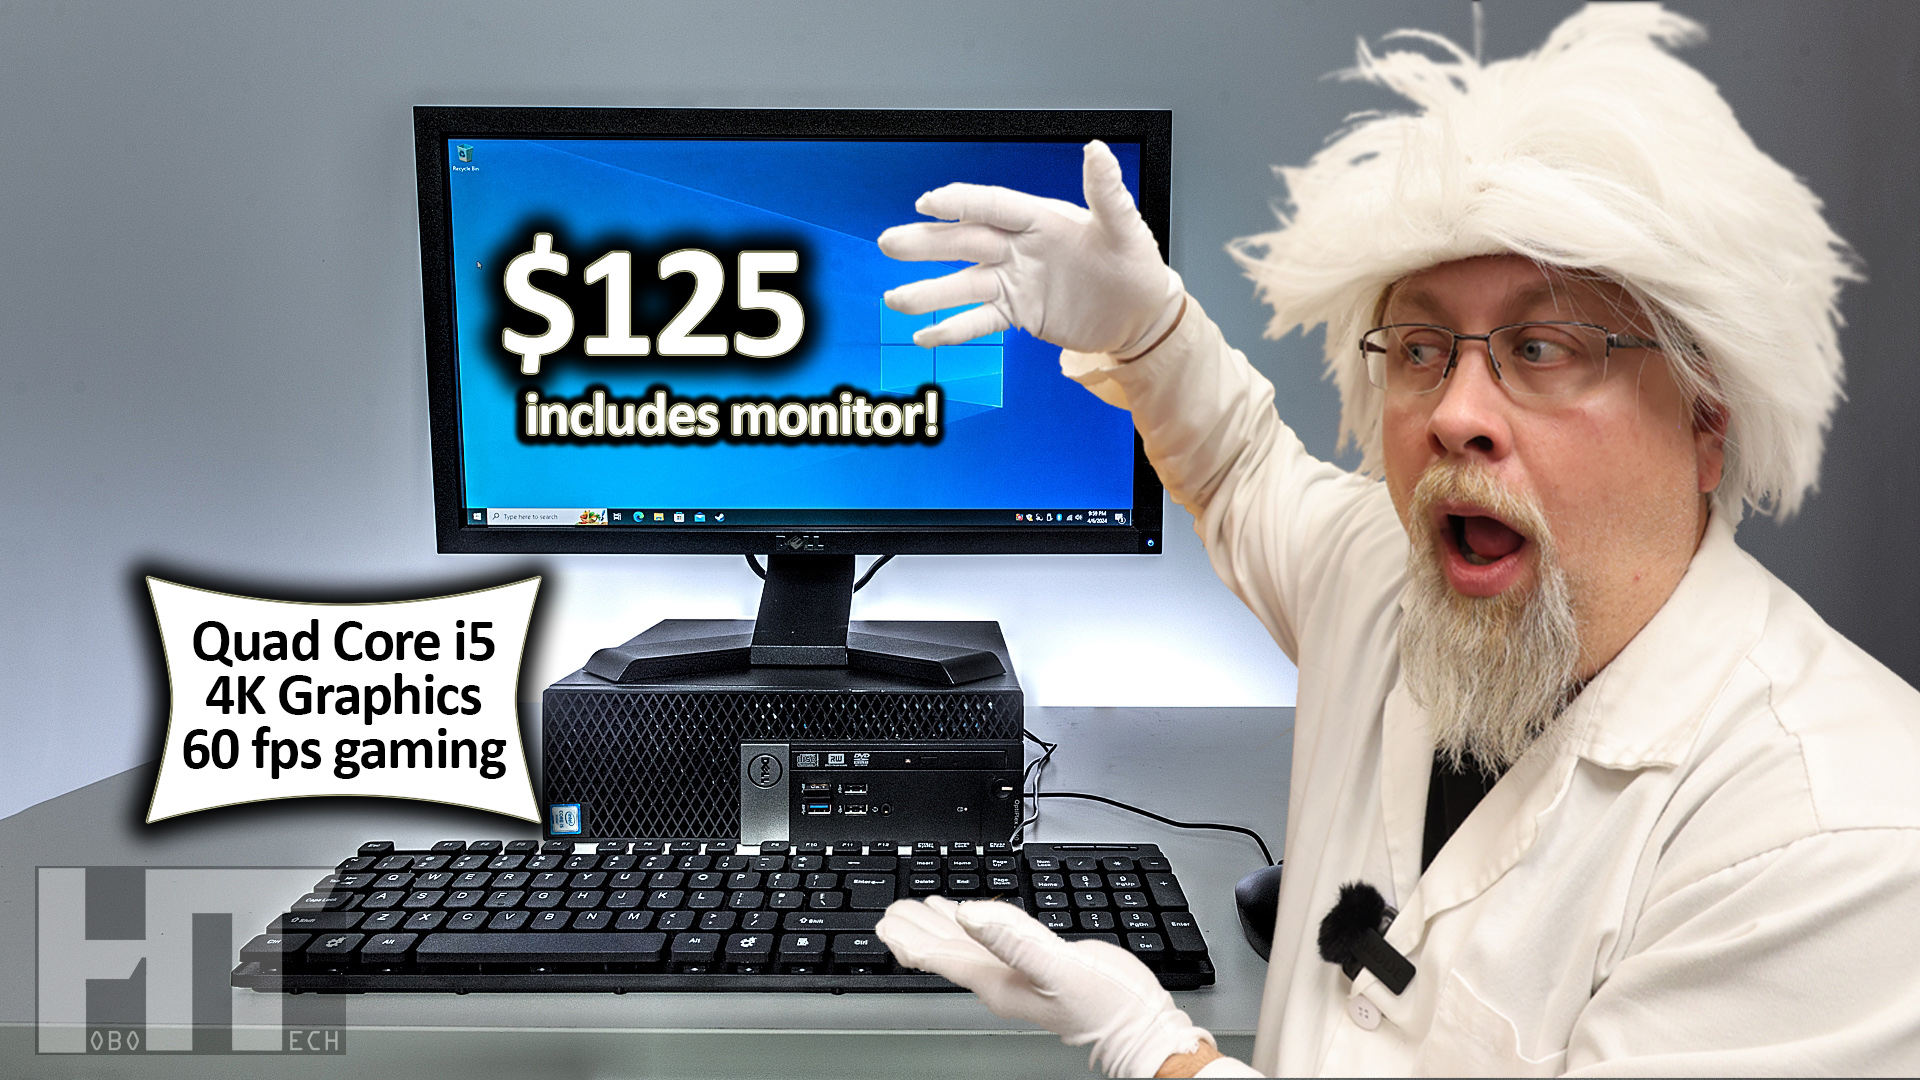
  • No, this isn’t click bait. You can actually buy a modern 64 bit, quad core desktop computer with LCD monitor, keyboard, and mouse for only 125 bucks. It also includes WiFi & Bluetooth, and comes preloaded with Windows 10 Professional, meaning it can run virtually any PC software, including most games. If this sounds too good to be true, it’s not ,because I bought one myself to ask one simple question, is it any good? Let’s find out!
  • So what’s the catch? First, these aren’t brand new PC’s, but ones that have been refreshed by qualified Microsoft Authorized Refurbishers. These aren’t fly by night companies but ones that have a proven track record of professionally refurbishing Windows PC’s. Being in this program allows them to install fresh, new copies of Windows at virtually no cost. Which is one reason why they are so inexpensive.
  • These PC’s originally started as new computers that were likely used in a corporate environment. When a business gets new PC’s, for example to move to Windows 11, the old PC’s get recycled to refurbishers that then clean them up, and flip them for resell in bulk. What this means for you, is that you get what looks like a brand new, totally clean, and fully functioning computer for pennies on the dollar. In most cases you won’t even know the parts were used because they are cleaned, tested, hard drives are wiped, and anything broken has been replaced. The PC I bought also includes a refurbished monitor, a new keyboard & mouse combo, and a full copy of Windows 10 Pro pre-installed in that $125 price. Amazon Refurbished does provide a 90 day warranty and some of the companies selling these bump that up to a full year.
  • Before we take a look at the PC in detail. You may ask why you even need one to begin with.
  • In 2024, there are still many reasons to own a desktop PC. While it is technically feasible to do most things online with a modern cell phone, there’s a lot of software out there that still requires a PC or Mac to run. Many tasks are simply easier on a big screen with a full keyboard and mouse. If you type a lot, need to multi-task, or use spreadsheets you know what I mean.
  • Yes, you can use a laptop but even the cheapest Windows laptops start around $350 and are honestly, garbage. They have horrible screens, mushy keyboards, and are slow as molasses for any real tasks. Let’s not even talk about Apple products because we all know what those cost – even the used market is crazy.
  • While the $125 PC I’m about to show you isn’t a power house by any means, it is far better than a cheap $350 laptop and is almost as portable. These are compact “flat top” or horizontal cases that can also be ran in the vertical position. They include a DVD drive so you can install software from CD’s or DVD’s as well as watch DVD movies. There is no floppy drive but they do support boot loading from flash drives. The included monitor is 19” which is just the right size to stick on top of the case as you see here and takes up very little space.
  • If you’re saying, well laptops have batteries and you can use them anywhere. My answer to that is “I have dozens of reviews on small micro power stations that will run this PC probably a lot longer than your cheap laptop.”
  • Okay, let’s get on with the review – starting with the basic specs of this PC.
    • This model is the Dell Optiplex 5040 with an Intel Quad Core I5-6500 processor clocked at 3.2ghz but boosts to 3.6ghz. This CPU made its debut in 2015 but is still a 64 bit processor that supports most of the modern Intel features such as Speedstep & Virtualizaion. This processor does include Intel HD 2500 graphics and supports up to 3 monitors using InTru 3D and Clear Video HD technology. All this means is that videos and graphics will look great. While I’m not a fan of processors with built in graphics, they do keep the price down. I do have an upgrade path for better graphics planned towards the end of this video.
    • This PC comes with 8GB of DDR3 memory which is fine for most tasks and can be upgraded to 32GB. We will add additional memory during testing for $20 to see how much faster it gets.
    • It also includes a 500GB SATA hard drive which can be upgraded later if needed. That should be plenty of space for most.
    • At this price point, it also comes with a 19” LCD monitor, a new keyboard and mouse, and Windows 10 Pro which is nice because Windows 10 Home sucks.
    • Now the reason I chose this specific PC is because it is still modern, and comes with enough power and memory to handle the majority of tasks. While it won’t handle the latest Call of Duty or edit 4K videos, you can get pretty close with a few choice upgrades.
    • What I will do first is test it as-is with a benchmark program to get a baseline then run a few popular games to see how it does. Then I’ll upgrade the memory and run the same tests again. Finally, I’ll upgrade the graphics and see how much improvement we get.
    • First, let’s put the thing together…


  • Default tests: PCMark, GTA5, Minecraft, Skyrim
  • Added GPU, repeated tests.

Opinion:

  • Wow! I have to admit I’m really shocked just how fast this thing gets with just a few minor upgrades. Yeah, I doubled the price of the PC doing it, but we’re still under $275 with all of the upgrades and the result is a PC that can handle some pretty serious gaming and is pretty snappy when it comes to programs. The major bottleneck is that clunky 500GB hard drive. I bet if I swapped that out for a SSD this little box would scream even with only 16GB of memory. [See YouTube Video after upgrade]
  • This goes to show you that just because you’re old, doesn’t mean you’re dead. While there are some amazing high end processors out there you have to realize that most of the software on the market today is far behind today’s monster processing power. A lot of stuff runs just fine on 10 year old hardware as long as you have half decent graphics and memory. A quad core 3.5ghz processor is generally “good enough” for anything short of high end gaming or video editing. If you’re not a serious gamer and you just tinker with photo/video editing, and want a much better experience online than a tablet or laptop … this is a real eye opener and a huge value when it seems like everything is just getting more expensive. They are also so easy to upgrade with the tool-less design that anyone can do it. I would totally buy one of these PC’s as a gift to anyone that wants or needs a computer. At $125 that’s less than the cost of a decent night out with the family. Instead of dinner for mother’s day, get her a PC! Kids need a computer for school? Bam. If they break it, so what. With the included DVD player and HDMI output it would even make a great entertainment center PC for your TV. The applications are endless at this price.

Pricing

  • On a final note about that price. I’ve been calling this the “$125 PC” because that’s what I paid for mine from Amazon Refurbished just a few months ago. This particular model’s price varies depending on which reseller that day has the “buy box” and that’s not always the one with the lowest price. I’ve seen this same PC go for as low as $121 or as much as $139. There is a lot of competition with this model so you may spend a few dollars more or less than the quoted $125. I purchased mine from the seller “United PC Tek” and if you get it from the same seller it should be identical to mine or somewhat close. I know some of the other sellers may offer the same product in a different Dell case or may include a different brand monitor of the same size. Since this stuff is refurbished and limited to product in hand, what they sell over time is likely to change.

CHECK IT OUT HERE: https://gohobo.io/dell7010

Graphics Card Upgrade: https://gohobo.io/gt1030

Memory Upgrade: https://gohobo.io/ddr3l

Speaker Upgrade: https://gohobo.io/IEbm

SSD Hard Drive Upgrade: https://gohobo.io/evo870

DVI to HDMI Cable (for graphics card upgrade): https://gohobo.io/QhGZ

CFORCE Portable Monitor: https://gohobo.io/bJlh (2.5K version – 4K sold out)

WANT A FASTER PC? Dell 7020 i7 with SSD $161! https://gohobo.io/dell7020


bluetti ac240 b210

BLUETTI AC240 2400w IP65 Water Resistant Modular Solar Generator Battery Power Station

The Professor reviews the IP65 water resistant Bluetti AC240 solar generator and B210 modular battery bank good for up to 20kWh of power and 4800w output in parallel mode.

  • Bluetti has released yet another AC200 series power station that oddly seems to compete with it’s own most recent release, the AC200L. Despite having a smaller battery, this one is called the AC240. So what’s the big deal? Well the AC240 comes packing some new features not supported in any of their other midsize offerings. Such as an inverter parallel ability only found in their flagship products (so you can hook two together for more power), direct battery expansion support up to 20kWh with their new B210 battery, a new app-free interface that lets you change all the settings without needing an app and then turn off all WiFi and Bluetooth, and last but not least… IP65 water resistance. It certainly ticks a lot of boxes. But, is it any good? Let’s find out!

Features

  • Battery Capacity/Tech/Cycles: 1536wh LFP battery rated 3500 cycles to 80% capacity and can be expanded up to a whopping 10kWh of capacity (20kWh if in parallel mode) using the new IP65 rated B210 expansion battery we’ll check out in a bit.

  • Size/Weight: It measures a tall 17 x 12 x 16 inches and weighs in at a meaty 72 lbs this is 10 pounds heavier than the AC200L, that has a larger battery and same size inverter. Not really sure where it packed on 10 extra pounds but mcdonalds did reintroduce the double big mac recently. Hmm… 

  • Design/Display: The AC240 rocks the same high quality color LCD as their other models, and this one shows you everything you need to know from watts in and out to time to charge and discharge. I counted 29 total pieces of information on display. Dang.

  • Inverter Size/Type: This has the same power inverter as the AC200L or 2400w with a brief 3600w surge. Of course they offer their proprietary “power lifting” feature that claims to power resistive devices up to 3600w, but it does this by dropping the voltage of the inverter. I always suggest turning this feature off to prevent damaging your appliances.

  • Ways To Charge:

    • The AC240 can charge via AC wall outlet or grid power using the included cable, up to 2200w for charging from 0-80% in 45 minutes. However, this product is factory locked to 1800w and in order to unlock faster charging you need to get a pass code from support. Just be aware of that.

    • It can of course charge from solar with the built in 1200w MPPT controller in a theoretical 2 hours under perfect conditions. However, unlike the AC200L’s 145v controller, this one is limited to a maximum of 60 volts at 21 amps. That’s right. 60 volts. That’s going to make it quite difficult to hit that magic 1200w mark because you’d need the perfect series-parallel combo of panels to reach 60 volts at 21 amps without over volting. Remember, “you can over amp but you can’t over volt”. Over volting a power station will result in either a shut down, or smoke. We’ll get deeper into this situation, in a moment.

    • Last and certainly least you can charge from a 12 or 24v source at 8.2 amps that’s good for 100w and 200w of charging respectively.

  • 12v Output Types: Bluetti decided to ditch the fancy new proprietary 48v output on this model and go back to the very useful 30A 12v output that van lifers, RVers, and hobbyists love. There is also the standard 10A lighter socket for powering your retro items.

  • USB Output Types: The AC240 offers the typical pair of USB-C 100w PD outputs alongside a pair of 18w USB-A QC ports. This is standard fare nowadays with most midsize power stations.

  • Other Outputs: Note that Bluetti doesn’t seem to be offering wireless charging pads anymore on their latest offerings and this product is no exception. I personally miss the wireless pads. Maybe because this is a stackable product they opted out this time.

  • Other Features:

    • The AC240 does offer the aforementioned Parallel ability where you can use an optional hub to connect two AC240’s together. This shares the inverter and battery power between the two units equally and will split the loads. However, this parallel ability has a very important limitation that we’ll review in a moment.

    • App haters rejoice! You no longer need an app to change the major behind the scenes settings in your AC240. You can also opt to disable all wireless access permanently until you decide to turn it back on. 

    • The AC240 and B210 are rated IP65 dust proof and water resistant. This means dust can’t get inside and you can shoot a ¼ inch stream of water at 3 gal/min from any direction into the unit with zero damage done. This is very handy if you need power outdoors in severe weather or on a boat.

  • Warranty: 6 year warranty for both the AC240 and its B210 battery

Testing

  • DC Battery Capacity Test (time lapse): 1210wh/1536 for 79%. If you were paying attention to the time lapse you’ll notice I was using the 30A output instead of the cigarette lighter. I did this to speed up the test thinking that it may score better around 20A. It certainly didn’t help. The AC200L scored 5% better on this test, but it doesn’t offer the coveted 30A output of the AC240 so it’s going to be more efficient at DC.

  • AC Battery Capacity Test (time lapse): 1270wh/1536 for 83%, which is average for the industry but nowhere near the 91% scored by the AC200L. I assumed these two inverters at 2400w were identical but they can’t be, and we’ll verify this in a moment.

  • Phantom load / Parasitic drain test

    • DC consumption: used 177wh (%) over 12 hours or about 354wh over 24 hours. This is on par with other midsize stations and pretty close to what the AC200L scored.

    • AC consumption: used 109wh (%) over 4 hours or about 654wh over 24 hours. If you left the inverter on it would totally kill the battery in under 3 days. This is literally double the idle consumption of the AC200L, so this tells me that they are using a totally different 2400w inverter on the same 51v battery architecture.

  • I’m always asked how long stuff will run. Compensating for usable capacity, you can pause this chart to see approximately how long common appliances will run on this unit.

    • 13500 btu RV a/c (1200w @50% cyc): 2 hrs

    • 6000 btu window a/c (400w @50% cyc): 6 hrs

    • 20cuft modern fridge (1.2kwh/day): 1 day

    • 1500w heater: <1 hour

    • 1200w microwave (1800w): 40 mins

    • Keurig coffee maker (1200w 60wh/c): 20 cups

    • Instant Pot (1000w @50% cyc): 3 hrs

    • Hot plate (500w): 3 hrs

    • 55” LED TV (80w): 15 hrs

    • Macbook (60w): 20 hrs

    • Box Fan (50w): 24 hrs

    • CPAP (30w): 40 hrs

    • Chromebook (15w): 3 days

    • Tablet (5w): 5 days


  • Sine wave check under load: 120v / 60hz

  • Inverter capacity test (max): 3200w >5s

  • Cooling ability test (rated @ 5mins): 2400w max

  • Inverter fan noise db: 49

  • Max Charge Rate AC @ watts/volts: fast w ; quiet w; standard w

  • DC Input Range: 12-60v

  • Max Charge Rate DC @ watts/volts: 12v 100w; 24v 200w; 48v 1050w; max 60v 1020w (equipment limited)

  • Charging fan noise db: AC max 43db ; AC min 0db ; Solar 0db

  • Simultaneous charging ability: 1020w solar + 1180w AC = 2200w (amp limited)

  • Pass thru / UPS: 15ms pass with PC test

  • DC Output(s) Max Rate: 10A 12.6v; 30A @ 360w pass

  • 12v output(s) regulated: 13.6v

  • USB output rate check: 2x 100w pass

  • Wireless/other output: na

  • Amp interference test: pass

    • AM radio test: inverter noisy

    • EMF test: 70 (very high)

My Opinion

  • The AC240 is another fine product from Bluetti, a brand that releases more new products each year than most hobos change their underwear – present company excluded. The new parallel ability is very cool along with the ability to store up to 20kWh of power if you max out the battery capacity with 8 of those B210 batteries. I like the new B210’s. They’ve managed to squeeze 100wh more power than the B230 for only one extra inch of space. However, like the AC240, it’s quite a bit heavier. Like 14 more pounds than the B230. So this doesn’t make sense to me. Does IP65 water resistance really create so much more heft? I suppose with the water proof chambers and this mysterious bleed valve system it can. But for the customer, is the extra size and weight worth it? I’ll leave that up to you.

  • One thing that I know app haters will adore is the ability to change all the major settings and totally disable WiFi and Bluetooth. I was literally just asked this question a week ago, if such a modern power station exists. Now it does.

  • Where the AC240 falls flat in my opinion is the limited solar charging voltage. It maxes out at 60v compared to the rest of the 200-series 145v limit. Maybe Bluetti was trying to reduce the heat inside of this sealed up case? Because of this limit, those that charge with big panels are likely to choose one of the other Bluetti models.

  • The AC240 does shine when it comes to upgradability. If you really need 4800 watts of power in a portable package this is definitely the way to go. Two of these units can be easily placed in just about any vehicle and with a true 30A RV outlet available, you can power a ton of stuff at 120v. Just be aware that the 50A RV outlet on the hub is NOT 240v and will NOT power a 50A RV or any 240v appliance for that matter. I found this out the hard way, and this by design. I did write to the CEO of Bluetti with my complaint, and a dire warning that offering a 240v style NEMA 14-50R outlet that only outputs 120v is going to put them on the chopping block with some customers. I’m hoping that they will update this product or the hub to output split phase 240v as it would be a simple process of running both inverters in opposite phase with each other instead of in the same phase.

Pricing and Competition

  • Product Price with current discount:

    • The AC240 lists at $1399 on Bluetti’s website which happens to be the exact same price as the AC200L. Go figure. However, I do have a discount code in the description of this video that will knock $100 off the AC240 for a limited time until April 29th.

  • Recommended Solar Panel Type/Size:

    • As for solar, you can use a pair of Bluetti’s PV420’s in parallel and charge at a solid 800w with no issues, or go for 4 of their PV200’s in series-parallel for the same effect. The PV420 is my go-to choice for a portable panel when camping and I’ve beat the tar out of mine for about 2 years now with zero issues. If you’re looking for something for a more permanent install, check out my list at gohobo.io/solar for ideas.

GET THE AC240: https://gohobo.io/ac240 use code HOBO240 for $100 off!

(also score $150 off using code HOBO150 on the AC240 + B210 + 2x PV200 bundle!)

Prefer the AC200L? https://gohobo.io/ac200l

Solar Panel options at: https://gohobo.io/solar


ecoflow delta pro ultra smart home panel 2

Power Your Home! Ecoflow Smart Home Panel 2: Complete Backup System Install & Review

The Professor installs two 7200w Delta Pro Ultra power stations with the Smart Home Panel 2 complete LiFePO4 battery home backup system.

In January, I did a full review of Ecoflow’s new 7200 watt behemoth, the Delta Pro Ultra and they also sent along with it their new Smart Home Panel version 2. My Delta Pro Ultra at the time was a prototype model with some limitations and they have since swapped it out for a pair of shiny new retail models so that I could demonstrate what this Smart Home Panel 2 can do, and find out … is it any good?

Now the SHP2 (which I will call “the home panel” from this point on), does require some installation. The amount of installation depends on what you’re using it for. If you’re installing it as a replacement to your existing breaker panel or alongside an existing one, how many circuits you plan to use it with, if you need both 120v and 240v service (which would be a big yes if you’re using for your home or in a garage to charge an electric vehicle), and the biggest pain point is going to be if you plan on having your Delta Pro Ultra (or DPU) in the same location as the home panel or in a different location.

My installation difficulty I will consider moderate since I will be requiring 240v service and instead of replacing my existing breaker panel that’s full of spaghetti and stuck between wall studs too narrow to fit the home panel, I’ll be installing it along side my current breaker box as a supplement to run just a few circuits. Over time, I will likely add additional circuits to it but for this demonstration my plan is to install a single 240v 50A line that goes to my full hookup RV site, and a pair of 120v 20A lines that run the freshly installed outlets my new lab addition. The rest of the building circuits that existed when I got here will remain in the old box. I’m also going to install the Delta Pro Ultras in a separate room so that is going to entail running some heavy duty 50A cabling about 25 feet from their location in the next room over to where the Smart Home Panel 2 will reside next to my current breaker box.

DISCLAIMER: Now everything I’m going to talk about from this point forward is going to apply to the United States and other parts of North America that run dual phase 240v grid power at 60hz into residential properties. This install is also going to follow the local electrical codes so what I do may not apply entirely to you if you live somewhere else. This review is not meant to substitute for professional advice from a certified electrician and is for entertainment purposes only. Anything you repeat in this video is at your own risk.

Now that’s out of the way … Here is all the equipment I’ll be installing over the next few days.

  • We have a pair of Ecoflow DPU’s with a total inverter output of 14,4kW and that will be at 240v. Since we have a pair of 6kWh batteries we’ll have a total of 12kWh available. I will expand this capacity later.

  • We have of course the Smart Home Panel 2 which comes shipped like this in one big piece. This bottom part is where up to 3 DPU’s can plug in, and can be separated and installed in a separate location. This is what we’re going to do. Note that if you do install the input box in a separate location, you’re going to need to run 6 gauge cabling if you have 2 DPU’s, and 2 gauge cabling if you have 3 DPU’s. I’ll be using 6/3 Romex for this install good for 55A since I only have a pair of DPU’s.

    • Also of note, that you’ll need to run an equal length of Category 6 or better Ethernet cable to digitally connect the DPU input box to the Home Panel. The Home Panel contains the brains of the unit along with the Bluetooth and Wi-Fi antenna. So where you install the Home Panel will need Internet access to sync with the Ecoflow app and also do any updates. Now, if you don’t plan to ever use the wireless features you can install this in an area without Wi-Fi but you really should “bench install” it first in a location with Internet so that you can get everything online, setup the way you want it which can only be done via the app, and do any firmware updates before you do the permanent install offline.

  • Last but not least we have the Ecoflow Power Insight display which is basically just a big Android app that let’s you see real time what’s going on between the Home Panel and DPU units. This way you don’t have to keep looking at your app. You can mount this anywhere as it works wirelessly. It does charge with USB-C and has a cool magnetic mount so you can wall mount it then quickly remove it to carry it around.

INSTALL

Okay, so let’s show you the before shot and explain what we’re going to do. Then I’ll try getting some footage during the actual install. When it’s all done we‘ll fire it all up and run the home panel through its paces. The home panel does track usage over time so I’m hoping to get at least a few days of data before this video has to come out.

  • Now that the install is complete, let’s check it out. [tour]

  • The Home Panel 2 is a Smart space saving design that can be installed in two different ways. Because I decided not to have the DPU’s in the same room as the Smart Home Panel 2, installation was significantly more difficult than it would have been to have everything in one place. It took one and a half people about 8 hours (or 12 man hours) start to finish, and then another couple of hours for me to program it and get everything online. You don’t just flip a switch and the home panel starts working. You have to tell it via the app every circuit you want turned on and if that circuit is 120v or 240v.

  • It’s all very easy to do though, and the app is fantastic. Since this sucker’s electrical, it’s far safer than gas, propane, or diesel generators. There are no exhaust pipes to run, fuel to store or leak, and no chance of CO poisoning. Unlike a gas generator, this can be installed entirely indoors and it’s so quiet you can even sleep in the same room. Doing that with a fuel generator of any kind would not just be annoying, but deadly.

  • The install, however, didn’t go perfectly. I did end up wasting a solid half an hour because nowhere in the instructions does it say the face plate needs to be installed before the thing will work. I was pulling my hair out (and I have a lot of hair) trying to figure out why the DPU’s wouldn’t send power to the panel. Even with the grid power turned on, nothing works without that front panel in place. The outer swing door is optional. Speaking of the door, it can open in either direction.

  • Other flubs during install. Don’t forget about the Cat 6 (or better) Ethernet network cable like my installer did. We ended up running it outside of the conduit into the home panel because the main cable was already blocking up the conduit. Fortunately, my install is indoors so we don’t have to be concerned with weather proofing anything or rodents chewing cables.

  • We used simple 2 inch PVC pipes, unglued, because I may want to run additional cabling for an upcoming project. 2 inch pipes made it easy to navigate those 90 degree bends with that 6 gauge 3 conductor non-metallic cable (in electrical speak that’s 6/3 NMB cabling). The cable I got ran about $4/foot so don’t forget to factor that cost into your installation.

  • Installation costs for me here in rural Arizona ran about $700 for parts and labor to run the DPU box about 25 feet from the home panel, and to rewire several circuits from inside the wall over to the home panel. This same job in California would be about double. It would also be a lot more expensive if this was an outdoor installation. Then again, if you plan to keep the DPU and home panel in the same location then parts & labor costs would be minimal. Ecoflow states that it takes about 4 hours to install and that sounds about right if you’re putting everything in one place, and you have an electrician that goes gangbusters on it.

  • Speaking of regulations, some electricians won’t touch anything not UL listed. The Smart Home Panel 2 is UL1741 certified so getting it installed professionally won’t be a problem. In the states of California and Texas, Ecoflow is also offering free consulting to find you a local installer.

DEMO

  • Okay now let’s talk about what this thing can do and I’ll then demonstrate all of the major features. It is a very impressive piece of technology.

    • Because the units balance themselves, you can technically send all of your solar into one DPU and once they are out of balance, the power will be sent to the lower voltage battery. Although, if you do have multiple DPU’s in this setup I do recommend trying to put some solar (or external battery charging) on each if possible just so you don’t get stuck in a situation where you need maximum inverter power while the batteries are balancing.
    • Speaking of solar, the DPU’s dual input is class leading by a mile. You have both a high and low voltage input good for a total of 5600 watts. The low input can take 30-150v while the high input can take 80-450v simultaneously. This is more than double the solar capacity of the competing flagships. For a comprehensive review of the Delta Pro Ultra be sure to check out my full technical review from January. I’ll link that up here and in the description of this video.

  • Power Insight

    • Unlike the app, the Power Insight “all in one” energy management system works without Internet access. You get all the information about your system in one place that can be hung on a wall to wirelessly charge then moved around your property to wherever you need it. You can even run other connected home appliances with it like smart plugs, thermostats, and matter supported smart devices. It also shows the temperature and humidity of the area it is in.

    • What about ROI or return on investment? Now I do have a couple of days of data in the system for a small 400 sqft well insulated outbuilding. You can see here that I already saved a few bucks off my next electric bill. While there is a large upfront cost, that’s money no longer stuffing someone else’s pocket. They can raise rates as much as they like or have rolling blackouts every day and I won’t care now. Bring on those monsoon thunderstorms!

    • Speaking of storms, we actually had a 2 hour long blackout the other night due to a nasty snow storm and the Smart Home Panel 2 rocked it like a champ. You can actually see the blackout occur when reviewing the data history for that day. I also got a message from the Ecoflow app that the grid was down and the home panel was powering loads. That’s so cool!

    • Obviously, the more loads you power via solar and the higher your electric rates are, the faster you’ll roll back that electric meter. If you have a time of use plan with your electric company, you can really save a load of cash because the home panel system lets you charge from the grid when rates are lowest, then will power your home from batteries when rates are high. Add some solar charging into that equation, and yes with this system set up properly, it can literally pay for itself over time. Especially when you factor in the current solar tax credits and ability to deduct about a third of the cost. If you have a medical necessity like a CPAP machine or Oxygen Concentrator, you may qualify for additional tax deductions. Check with your tax professional for more details.

    • One thing that is cool about solar incentives is that you can install your basic system this year, and say next year you realize you need more DPU batteries or inverters, you can take those same deductions again the following year too for your new equipment.

OUTRO

  • So the big question here is, do I think buying the Smart Home Panel 2 is a wise investment if you’re planning to plug one or more Delta Pro Ultras (or Delta Pros – and yes, that model is supported as well) into the wiring for your home, cabin, business, or off grid property? That depends…

    • First, the Smart Home Panel 2 does require dual phase 240v grid power to fully function. What I mean by that, is you can technically run the panel from a 120v source through the Generator input. At the top of the panel there is a manual safety switch built in that lets you switch from grid to generator for charging the batteries. I’m told that in 120v mode that only half of the circuits will work, but it will charge all of the attached battery units from 120v. So it is technically possible to use this panel totally off the grid if you have another 120v or 240v power source like a gas generator or even another inverter system. Since the panel is designed with grid tie in mind, it is expecting this source to run 24 hours a day. I’m going to spill the beans here and give you a hint that I will cover this scenario next month, when I run the Ecoflow Power Kits into this thing as a 120v generator. We’ll find out then just how well it works.

    • So if you have typical 240v grid service, I’d say this thing is magic and definitely worth the cost especially if you plan on running more than one Delta Pro Ultra into it – as it’s simply the best, safest, and fastest way to dump grid power into these units and get it back when you need it or at your beck and call. It’s just super awesome to push a button my app and decide how to power my building. I am going to soon hook it to my entire home and I’ll have an update coming on how that goes.

    • If you live totally off grid without 240v service, only plan to use a single DPU to power limited loads, or already have a transfer switch system in place then you’ll need to figure out of the upgrade cost is worth it to you. I think in a lot of cases it will, and in some cases it won’t. For example, if you just feed one DPU into a transfer switch and only charge it with solar, then the home panel won’t make a lot of sense.

    • What I’ve been using here in my lab for the past year or so is a manual transfer switch system that lets me swap between grid power and inverter power. That inverter power used to be a Renogy Lycan but is now an Ecoflow Power Kit. I had to disable that setup for this install so now I’m stuck using Ecoflow products to power my lab. That’s okay though because they are always very responsive when it comes to issues. I can always spend 15-20 minutes twisting a screwdriver to put the old transfer switch back in place if I have to. This only means we’re certainly going to be doing some long term updates on this product in 2024 and maybe beyond.

  • If you’re interested in the Smart Home Panel 2 or the bundle deal with one or more Delta Pro Ultra solar generators, I do have a discount code available that will knock a HUGE chunk of change off until April 26th, 2024. After that, you’re on your own.

  • If you’re concerned that you can’t pay for the entire system in one go, Ecoflow does offer financing with the first 6 months interest free (which is a big deal with today’s interest rates). Don’t forget to claim those tax incentives as well that will make this system a lot more affordable in the long run.

  • CHECK IT OUT: https://gohobo.io/shp2 use code EFDPUHOBO8 for $800 off until Apr 26th!

  • Now enjoy 6-month interest-free payments plan offer, available for as little as $834 per month. For TX & CA homeowners: check out the latest ‘Hassle-Free bundle’- including a DELTA Pro Ultra, a Smart Home Panel 2, plus installation service, all for just $8,999. for all US homeowners: The Smart Home Panel 2 Installation Consulting Service ensures a worry-free setup by tracking orders, managing fittings, and answering technical queries.

.